Tuesday, April 30, 2013

The Ladies Have Arrived!!!!

The ladies are in the building! And heaven help me they are as cute as can be! We got 8 chicks over the weekend. I love their little fluff butts.Who knew chickens were so cool. The breeds we ended up with are 2 Laced Wyandottes, 3 Easter Eggers, 1 Buff Orpington, 1 Black Australorp, & 1 Barred Plymouth Rock. We are in the process of naming them.

Tansy- Golden Laced Wyandotte
I'll post more photos as I have time and they all have names.

On the house front, we got a lot accomplished as well. The water heater, water softener, filtration system, and kitchen sink are all done. The cabinet faces are all painted and we're waiting on our hardware to arrive. We'll be installing appliances for the next couple of days and Brad needs to caulk the trim... and then we move. Life is happening so fast!

Monday, April 22, 2013

Slowing Down Again

It feels like every time we knock out a major achievement with the house things go back to a crawl. Why do the details take forever!?

Brad has been working on getting the baseboards put up and I've been painting the kitchen counter tops. We were initially going to go with a dark gray, but after one coat we both agreed that they needed to be darker, so back to the paint store for samples. Back to the house with said samples. Back to the paint store for paint in color of chosen sample. Back to the house to paint chosen color on counter tops. We ended up painting them black. Black Beauty if you want to be technical. I like the darker color much better. I finished up the 4th or 5th coat of poly on Saturday. Not so sure about this whole painting the counter tops thing now. Getting the poly to go on even has been a mess of trial and error. Everything I read said to use a brush, but that didn't go so well for me. I've ended up using a mohair roller and if I don't let it "roll" it seems to be going on a lot more even. I wouldn't be surprised if down the road we end up just pulling them out and putting in something from Ikea. We'll see how these hold up. At the end of the day, if it doesn't work, we'll only down about $100 + all my pain and suffering. I'm toying with being done with them at this point, or whether I should do a few more coats of poly. We'll see how motivated I feel.

Terrible photo of the final color for the counter tops just for fun.

Brad has the baseboards done all of the rooms that have flooring now. It's strange to start seeing everything come together. I've gotten all the nail holes filled so all that is left to do for baseboards is paint and caulk.

Yesterday my man also installed a new water heater (don't ask), water softener (again, don't ask), and whole house filtration system. This is definitely not what we were expecting do to, but on the bright side, everything is shiny and new now. And the down side, looks like we're going to be living off of rice and beans for the month. ;) Brad tore out the funny little tiny closet that the water heater sat in, so now the mud room/utility room is wide open. It looks so much bigger and brighter now.

So, what are the next steps you ask.... or at least that's what I ask myself every day. Well, we need to finish up the paint on the cabinet faces and put those back on the cabinets, put up the back splash behind the stove, install all of the appliances, install the kitchen sink, and sweet heavens I think we can move!

Wow, did I really just type that? I don't know what I'll do with my life after all these major remodels are done...

Also, I know I have posted photos in a while, so I'll get to that this week. And.... Friday is going to be a very special day, so stay tuned!

Thursday, April 4, 2013

Future Fancy

My dear Lydia and I are having a "coop off". Now I'm sure you're asking yourself, what is a coop off? Honestly, I'm not completely sure. Basically we're trying to make the most amazing space for our ladies that you've ever seen. While hunting the webs for ideas I stumbled upon this...


It might be the most amazing thing I've ever seen. Now this my friends is a COOP! The author of the Fancy Farmgirl blog is Tiffany and it's a good thing she lives across the country from me because I'm pretty sure she'd slap me with a restraining order, and that would be embarrassing. I think we may have been friends in a former life. Her blog is pretty amazing though and she is basically living the life that I dream of. Aside from the being super crafty part, cause I'm really not. But c'mon, the farm, the chickens, Churro the Burro!!! I'll get there. I'm just a little behind.

In the meantime, I'm off to put a second coat of paint on my countertops...

Wednesday, April 3, 2013

DIY Plywood Floor Tutorial

I've never done a tutorial before, but I've had a lot of people ask us about our floors, so I decided to put it out there in case anyone might benefit from our experience. I'll start with a quick back story.

My husband and I stumbled upon a property for sale that we absolutely loved. It was 20 acres, partially wooded, and extremely close to town. The only drawback was that it was also home to a double wide, which we did not particularly love. I like to believe that I am pretty open minded about aesthetics, but this thing was pretty hideous. It was in good condition, but definitely needed a major interior face lift. We eventually want to build on this property and get rid of the double wide, so after successfully closing on the property we started trying to come up with cheap and creative ideas for remodeling. Flooring was extremely difficult because the DW is over 1,800 sq ft and having dogs, we hate carpet. Everything we looked at was going to run us over $2/sq ft and we just didn't want to sink that kind of money into it. So, after scouring the internet for ideas, this is what we ended up doing.

Our first step was picking out Plywood that we liked and was reasonably priced. Not as easy as you'd think. Thankfully, when we were ready to buy the wood Menards was having a sale on 1/4 birch veneer plywood. It was over $10 off a for a 4' x 8' sheet. We ordered a bunk (50 sheets) to start with. This cost us right around $800 and would cover a bit under 1,500 sq/ft. We then had the boards ripped into 1' x 8' boards. 


We toyed around with various ways to lay and secure the boards. We looked at using laminate glue and laying them almost like tile, but that was going to get extremely pricey. Almost the cost of the wood itself. We decided on using a combo of sub-floor glue and nails. At first we were only applying the glue to the center of the boards, but after laying about 2 rows, we discovered that is was better to apply it to the edges to make sure the the boards didn't ever pop up on the sides.


After gluing a board down we then nailed each board in place as well. We made a "nail template" that you can see below to ensure that all the boards were nailed down evenly. You can't really see the nail holes now that they're done, but it was very handy to have. We used a chalk line to start with squared up to the center of the house and then we just started putting boards down like it was a normal hardwood floor.


We used 1" straight nails to secure the boards. I really wanted to use hardcut masonry nails, but this would have added not only significant cost, but significant time as well. I would have loved the look that the masonry nails added, but I'm glad we went with the cheaper/faster method.


Measuring and cutting was definitely the most time consuming part of the process. Luckily my husband has a good head for math and took care of it. 


After the floors were down we sanded everything with an electric hand sander and 220 grit paper. We considered the idea for renting a floor sander, but were concerned that we might go through the veneer on the plywood which we definitely didn't want to happen. There were quite a few spots where the boards were slightly uneven where the edges so we sanded those down. In the really bad spots we went ahead and sanded through the veneer to even them out and it gave the floor more of a rustic look which we really like. After sanding we vacuumed the floors and went over them with tack cloth to pick up any remaining dirt or sawdust.


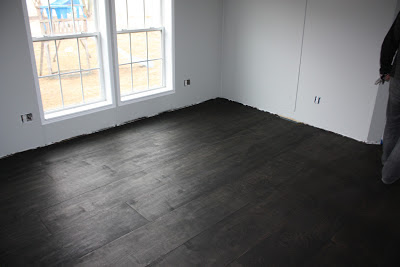
These are the floors after being sanded and prepped. You could potentially skip the next steps and go straight to sealing them at this point if you wanted a lighter floor. We wanted dark almost black floors so at this point we started the staining process.

The stain we used was Miniwax Ebony. You can use any color or brand that you want, just make sure you test it on a board before applying it. Seems like common sense, but I have been known to simply buy a paint color without testing it out first, so I thought I'd mention it. Patience isn't my best virtue.


We used a deck pad stain applicator to apply the stain. We put it on pretty thick to make sure that the edges and nail holes got stained and there weren't any sneaky natural birch spots showing through. We applied stain on 2 rows of boards at a time, allowed it to sit for 5-10 minutes and then wiped away any excess. Then we rinsed and repeated. It wasn't a hard process, but it is frustrating that you can only do 2 rows at a time, otherwise it's too difficult to reach the boards and remove any excess stain.


 After the first coat the floors were a bit splotchy and uneven. Honestly, I kind of liked the way they looked with only one coat. If I hadn't wanted them a little bit darker I may have tried to convince the DH to leave them with only one coat.

After the second coat of stain I was happy we went with 2 the color was just so much richer! It's hard to tell from the photo, but it really warmed up the floors.


Once all the floors had their second coat of stain we were ready for the sealer. We went with a product called Bona Mega Clear HD and I must say I was pretty thrilled with it. We chose the satin finish. There are a couple of ways to apply it but we went with a T-bar. From all the videos I watched it seemed to be the easiest and fastest application method.


I wish I had taken some video of the actual application process, but sadly I didn't. You can find a few different videos on Youtube if you are really interested in it. The sealer took 2 coats. One gallon covered about 550 Sq Ft for us. We let the first coat sit and cure for about 2 hours before applying the second coat.

This photo shows the difference that the sealer has on the color. It really makes everything pop!

Here are some photos of the finished floors. 
As you can see the Bona gave everything a beautiful even sheen.


We left the wood in the bathroom natural because we wanted a darker paint color. This gives you a good idea of how it will look if you decide not to stain the floors and go straight to sealing them.


Well there you have it. We kind of lost track of how much stain we used, but after tallying everything up our cost came in at about $1 Sq Ft. Not too bad. I hope this might help anyone else who is trying to do some low cost flooring. I'll update later on how they are wearing with our 2 dogs as well as some pictures once the baseboards are up.

Tuesday, April 2, 2013

The Future Ladies of the Coop

I've got about 50% of the supplies for the coop. I'm really excited to start the building project. I found some used cedar planks on Craigslist for the siding and thanks to some friendly folks from Facebook I got all the plywood I'll need for free! Even better quality than I was planning on getting too. I'd love to do the majority of the coop out of recycled materials. Doesn't hurt the bank account nearly as badly either so the hunt for more upcycled materials continues. I think all I really need now are about 4 4x4 posts, 2x4's for the framing, and some screening for the run area. We'll see how much I'm able to scrounge up.

In other news, I've finally landed on my chicken breeds. I've added some pictures just for fun.

2 Wyandottes- These hens lay on average 4 large brown eggs a week. They'll top out at about 7-8 lbs and are supposed to be pretty easygoing.

Silver Laced Wyandotte
Gold Laced Wyandotte
Welsummer- I'm not 100% sure I'll be able to find this one. I haven't seen it any of the local farm supply stores, but I'm hoping to hunt one down at the animal swap next month. They lay on average 4 dark brown eggs a week, are 6-7 lbs, and supposed to be pretty friendly.

Welsummer Pullet
Easter Eggers- I'm getting at least 2 Easter Egg Chickens. You never really know what you'll get with these gals as they are simply defined as chickens with the blue egg gene but don't fit into any specific breed. They generally lay 3-4 blue or green eggs a week. Hoping to luck out and get both a blue layer and a green layer.

White Easter Egg Hen
Cochin- This one is just for fun. They are super cute and super friendly, but only lay about 3 eggs a week, which will be the least productive girl of the group. That's ok, cause she'll have style. I just love how fluffy they are!

Blue Cochin Hen
And though I'm not currently planning on a rooster, if I ever do get one, I'm getting a Phoenix. Another rooster simply will not do. He will be named Hanz.

Silver Duckwing Phoenix Bantam

I still really would like a Sultan as well, but apparently those are pretty difficult to find. We'll keep our fingers crossed for King Cluck.

Monday, April 1, 2013

Finished Floors

That's right! The floors are finally done. I never thought this day would come. It feels so good to be able to put the floors behind us and move on to all the finishing touches. I'm absolutely thrilled with the way the floors turned out.

The Bona Mega really made the floors pop! The picture below shows the difference between sealed and not sealed. I was amazing at the difference the Bona made when we were all done.
Partially sealed floors.
Photo montage of the finished floors!!!

Sealed and completed plywood floors!


Close up of the finished floors.

After the floors we completed we started working on our baseboards. We were able to get them all painted and are hoping to put them up this week. We also managed to install a toilet, first time ever, and it's not leaking which is always good and ripped out the kitchen sink. Goals for the week include getting the baseboard up, counter tops painted, and appliances installed if we're lucky. 

Here are some more photos just for fun!


This photo was taken last October when we first started. Please ignore the McDonalds bag. Sometimes we make poor food decisions when we have not time.


This photo was taken this past weekend. My little DW has come so far!