Wednesday, September 18, 2013

Apt Blog Title

I've been extremely quiet lately, for that I apologize. I received a message on FB asking if I was still blogging and I think it was the little nudge I needed to do a long overdue update. Life is still flying by at a rate that is frankly quite frightening. We are still accomplishing new tasks on the house and property everyday and winter is (God willing) coming to a close.

Quick recap on where we are personally. Last July we got a bit of a push to jump in and finish the unfinished portion of the house (spare rooms and guest bath). With the arrival of our first child in just about 2 weeks, he gave us that little nudge that we needed to jump back into hardcore construction mode again.

List of current projects...
1) Coop- Just needs siding and it's 100% complete. Hoping to get this summer.
2) Spare room #1 (nursery)- Completely done! Just finished putting some pipe shelving up this past weekend. The room is complete with floor, door handles, trim, even a real ceiling light!
3) Master Bath- Still needs quite a bit of work. There is still not trim up in it. I'm trying to convince Brad to just rip out the current counter tops/sinks and put something new in because I'm super lazy and don't want to paint them. Also, I can't figure out what color I want to paint them anyway. We'll see if I'm successful. We need to put something up around the tub as well. I think Brad is planning on using either the old bamboo flooring we have or the cedar fence planks... In a perfect world, we'd just rip out the tub and shower and do a large standup shower across the wall. We'll see what this summer brings.
5) Door Handles- We have them! They are installed. We can actually close doors without jabbing pencils through the holes.
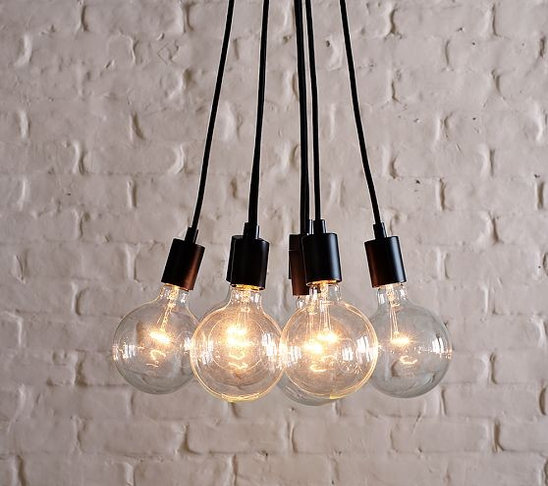
6) Lighting- We finished the exposed bulb cluster light over the dining room table and it looks pretty good if I do say so myself. It was a bit of a pain, but I'm really happy with how it turned out. I have everything we need for my mason jar chandelier. Maybe that will be this weekends project. It would be nice to get that one up in the kitchen.
7) Cosmetically we've updated a lot of little things around the house. I'll do my best to get the camera charged tonight and get some updated shots of how things look.

Thursday, July 18, 2013

Pinterest Destroys my Soul

The more I'm on Pinterest and the more I find cool blogs... the more I wish I was those people. Not that I actually want to be them, well maybe in a few cases, which is kind of creepy I know, but more I wish I was that cool, crafty, creative, DIY girl. You know, the one with the super creative blog that always has cool tips and tricks and new things to try out. That one that actually updates her blog... yeah, that girl.

How do people find time for it? I don't have time to be creative, let alone clean up the mess that inevitably occurs when I try to be creative. I console myself by firmly believing that I require way more sleep that these "creative types" that I am so envious of. They are like the "super moms" on Pinterest that make... well, everything.  They are the mom's that are without a doubt going to make me feel inadequate as a mother if we ever have children. Then I think, "you have kids.... how on earth do you have time for this!". Which I then revert back to my mantra.... they don't sleep.

Ever.

Regardless, I wish that was me. God kind of left out the creative gene when he made me. However, I am great at copying other people. ;) That's gotta be good for something. Right?

Maybe someday I'll attain this level of awesome, until then, I'll just check my Pinterest and feel even worst about my abilities. ;)

Wednesday, July 10, 2013

Carl

Roosters.... who knew they were so cool. I didn't. Whoever, this guy has stolen my heart. Originally Caroline, Carl sneaked his way into the coop. We weren't planning on having, or keeping, a rooster, but I could never part with him now.

As much as I love eggs, I may love this kid more. He's the first to come running, will sit in your arms, and is a stud. He's about 3 months old now and is just starting to get his saddle feathers. Can't wait till he's a full fledged Roo.


Tuesday, June 18, 2013

2013 Westrate Coop Raising: Part 3

And on and on it goes. I just keep telling myself we're going to finish this. Every weekend brings us closer, but I'm a little tired of working on projects every weekend. Such is our life though, it's really our own fault.

Anyhow, here is the latest photo update of the coop. It's fully functional and the ladies and Carl have been sleeping in it for a week now. #nomorechickensinthehouse We're currently working on the run so that we can leave for long weekends and not worry about anyone getting eaten. We got pretty far this past weekend. Not as far as I would have liked, but that's generally how it goes.
Window and door holes cut, interior painted.

Interior, I kind of ran out of vinyl. Oh well.

And then there were windows.

Trying to keep them from constantly dumping their water and food. It's still a work in progress.

It's not pretty yet, but it works!!!

Interior shot, temporary roosting pole. I'm going to glam up the inside, but I just wanted it to be functional for now.


The chicks first night in the coop.
Run construction. Don't worry, I'm painting the door.

Wednesday, June 5, 2013

2013 Westrate Coop Raising: Part Two

Amateur hour continues on the Westrate homestead. God blessed us with some beautiful weather to get some more work done on the coop. It's really starting to come along! Hoping to have everything functional by this weekend.


2 sides done and a roof. Hopefully I'll have completed coop pictures for you soon!

Tuesday, May 28, 2013

2013 Westrate Coop Raising: Part One

Ok friends, last weekend was the official 2013 Westrate Coop Raising! The size we finally decided on is an 8'x8' coop raised 2 feed off the ground with an 8'x16' run. We tried to make the size economical so that we are wasting as little material as possible. We got rained out on Monday, so the Coop Raising will go into next weekend, but you can't control mother nature. Chicks are in the house for one more week. What ya gonna do?

Below is a quick photo rundown of our 2 days pretending to be carpenters.

Just in case it floods?

Belle, not overly impressed with her new digs.
First side framed in!


The exact moment we both realized we may have gone a littler overboard. 
The ladies enjoying their first day in the sun.


Monday, May 13, 2013

State of Things...

We're moving.


Yeah, I just said that! We are moving this weekend. FINALLY!!!!!! I almost don'g believe that it's true. After this weekend, when I look out my windows this is what I'll see.


Below are some rough photos of the state of things. I'm hoping to get over tonight and get some stuff cleaned up for some better shots, but bad photos are better than no photos right. The only major change is that most of the cabinet doors are up now and they weren't when I took pictures on Friday.


Wednesday, May 8, 2013

Promises, Promises

I really am going to get some photos up here. Honest. If I wasn't so busy trying to finish our house, take care of the dogs and chicks, keep up on things at our current house... you get the point. We're busy. But this week... I'll have something for you this week. Maybe.

But here's the quick update. Kitchen sink, Fridge, dishwasher, and range are all in and functional. Brad is working on the dryer as we've run into a little snag with the placement of the dryer vent. We have the hardware on the kitchen cabinets and need to put the doors up. Trim is 90% done... It's almost a house.

Why do the end parts always take the longest? I'm really crossing my fingers that we'll still be able to move this weekend. Maybe Sunday, most likely we are going to get pushed to next weekend, which is a real bummer. I guess we'll just have to wait and see how far we get. I can always start moving non-essential items next week and get them put away during the weekdays and worry about all or our everyday "stuff" next weekend.

And the coop... that's the next thing on the list. Just found some windows on Craiglist. Pretty excited about them. Also, slightly addicted to Craigslist materials. Trying to hunt down a cool door at the moment.

Thursday, May 2, 2013

DIY Crazy!

I have a problem. My problem is that there are about 50 million different projects that I want to do and I just don't have enough time to get them all done! Let me outline just a few. We'll start with my lighting dreams...

This is the light that I want to go above the island in the kitchen. The small problem is that Pottery Barn thinks that I should spend $399 on it and I very strongly disagree. Solution, I'm going to make one. I found very detailed instructions here that I am going to alter slightly to fit my needs. I think I can make my version for around $150 which is way more reasonable. I don't mind spending money on a nice lighting fixture, but I am not putting a $400 light in the DW. That is just a little too fancy for us. Realistically, it doesn't look all that difficult to do. I've found most of what I need online, but I want to use cloth cord for the lights and that is proving a bit more difficult to procure. I'm persistent though, I'll find it! I'll find it if I have to make it myself. Add another month on to this one.
Lighting project number two. This one is for over the dining room table. Again, I plan to alter it slightly, I want the cords to be gray cloth cords that match the mason jar light and I want the light sockets to be white. I'm also planning on hanging the bulbs at slightly different heights. In my head, it's really cool. We'll see how it actually turns out.

So far that about sums up my lighting project for the time being. I'm sure I will find more things in the world of lighting. Someday I'm going to make things easy on myself and just buy stuff, but I guess there's not much fun in that huh?

Another item on the to do list is the chicken coop. We've got a lot of the supplies to build it, it's just a matter of finding the time to get it done. The plan is to move next weekend and I've told Brad that needs to be the next thing we do. The chicks will be about 4 weeks old by then and should be ready to get out of the house by 6 weeks. I really don't want them in the house when they get that big.

Dog Run- This one sounds simple enough in my head, but I know these things never are. We've decided that the front door will lead out into the dog run since we won't ever be using it anyway. Like the coop, the picture for this is in my head, but Brad really wants us to throw down gravel. I agree, though I'm a little concerned about drainage. The last thing I was is for it to reek of dog pee.

Coffee Table! I want to build a coffee table out of some old pallets that I have. I can never seem to find a coffee table that I like, so I'm making one. This is kind of what I'm thinking, though I'm toying around with some other options too. I definitely want it on casters, cause that's just kind of cool. I'm kind of thinking I want more of a bleached out wood look, though I'm not sure how to do that without doing a whitewash style. Whitewash could look pretty cool though. Decisions decisions.

A tufted ottoman for our "closet". Our bed and dressers won't fit in a single room, so we are having a master suite with one whole room dedicated to our clothes! I'm buying, yes buying, garment racks to put up and we'll put our dressers in there as well. I've always wanted a giant walk in closet with an ottoman in the middle. It makes me feel fancy, like a princess. And that makes me happy.

There are plenty more to add to the list, but I feel like I should go tackle some of these things instead of just talking about it. Mostly, I need to get my butt over to the new house and finish putting the cabinet doors up, install the dishwasher & stove. Build a platform for the dryer and washing machine.... the list just never ends! One step at a time, and breath, just breath.

XoXo
Erin

Tuesday, April 30, 2013

The Ladies Have Arrived!!!!

The ladies are in the building! And heaven help me they are as cute as can be! We got 8 chicks over the weekend. I love their little fluff butts.Who knew chickens were so cool. The breeds we ended up with are 2 Laced Wyandottes, 3 Easter Eggers, 1 Buff Orpington, 1 Black Australorp, & 1 Barred Plymouth Rock. We are in the process of naming them.

Tansy- Golden Laced Wyandotte
I'll post more photos as I have time and they all have names.

On the house front, we got a lot accomplished as well. The water heater, water softener, filtration system, and kitchen sink are all done. The cabinet faces are all painted and we're waiting on our hardware to arrive. We'll be installing appliances for the next couple of days and Brad needs to caulk the trim... and then we move. Life is happening so fast!

Monday, April 22, 2013

Slowing Down Again

It feels like every time we knock out a major achievement with the house things go back to a crawl. Why do the details take forever!?

Brad has been working on getting the baseboards put up and I've been painting the kitchen counter tops. We were initially going to go with a dark gray, but after one coat we both agreed that they needed to be darker, so back to the paint store for samples. Back to the house with said samples. Back to the paint store for paint in color of chosen sample. Back to the house to paint chosen color on counter tops. We ended up painting them black. Black Beauty if you want to be technical. I like the darker color much better. I finished up the 4th or 5th coat of poly on Saturday. Not so sure about this whole painting the counter tops thing now. Getting the poly to go on even has been a mess of trial and error. Everything I read said to use a brush, but that didn't go so well for me. I've ended up using a mohair roller and if I don't let it "roll" it seems to be going on a lot more even. I wouldn't be surprised if down the road we end up just pulling them out and putting in something from Ikea. We'll see how these hold up. At the end of the day, if it doesn't work, we'll only down about $100 + all my pain and suffering. I'm toying with being done with them at this point, or whether I should do a few more coats of poly. We'll see how motivated I feel.

Terrible photo of the final color for the counter tops just for fun.

Brad has the baseboards done all of the rooms that have flooring now. It's strange to start seeing everything come together. I've gotten all the nail holes filled so all that is left to do for baseboards is paint and caulk.

Yesterday my man also installed a new water heater (don't ask), water softener (again, don't ask), and whole house filtration system. This is definitely not what we were expecting do to, but on the bright side, everything is shiny and new now. And the down side, looks like we're going to be living off of rice and beans for the month. ;) Brad tore out the funny little tiny closet that the water heater sat in, so now the mud room/utility room is wide open. It looks so much bigger and brighter now.

So, what are the next steps you ask.... or at least that's what I ask myself every day. Well, we need to finish up the paint on the cabinet faces and put those back on the cabinets, put up the back splash behind the stove, install all of the appliances, install the kitchen sink, and sweet heavens I think we can move!

Wow, did I really just type that? I don't know what I'll do with my life after all these major remodels are done...

Also, I know I have posted photos in a while, so I'll get to that this week. And.... Friday is going to be a very special day, so stay tuned!

Thursday, April 4, 2013

Future Fancy

My dear Lydia and I are having a "coop off". Now I'm sure you're asking yourself, what is a coop off? Honestly, I'm not completely sure. Basically we're trying to make the most amazing space for our ladies that you've ever seen. While hunting the webs for ideas I stumbled upon this...


It might be the most amazing thing I've ever seen. Now this my friends is a COOP! The author of the Fancy Farmgirl blog is Tiffany and it's a good thing she lives across the country from me because I'm pretty sure she'd slap me with a restraining order, and that would be embarrassing. I think we may have been friends in a former life. Her blog is pretty amazing though and she is basically living the life that I dream of. Aside from the being super crafty part, cause I'm really not. But c'mon, the farm, the chickens, Churro the Burro!!! I'll get there. I'm just a little behind.

In the meantime, I'm off to put a second coat of paint on my countertops...

Wednesday, April 3, 2013

DIY Plywood Floor Tutorial

I've never done a tutorial before, but I've had a lot of people ask us about our floors, so I decided to put it out there in case anyone might benefit from our experience. I'll start with a quick back story.

My husband and I stumbled upon a property for sale that we absolutely loved. It was 20 acres, partially wooded, and extremely close to town. The only drawback was that it was also home to a double wide, which we did not particularly love. I like to believe that I am pretty open minded about aesthetics, but this thing was pretty hideous. It was in good condition, but definitely needed a major interior face lift. We eventually want to build on this property and get rid of the double wide, so after successfully closing on the property we started trying to come up with cheap and creative ideas for remodeling. Flooring was extremely difficult because the DW is over 1,800 sq ft and having dogs, we hate carpet. Everything we looked at was going to run us over $2/sq ft and we just didn't want to sink that kind of money into it. So, after scouring the internet for ideas, this is what we ended up doing.

Our first step was picking out Plywood that we liked and was reasonably priced. Not as easy as you'd think. Thankfully, when we were ready to buy the wood Menards was having a sale on 1/4 birch veneer plywood. It was over $10 off a for a 4' x 8' sheet. We ordered a bunk (50 sheets) to start with. This cost us right around $800 and would cover a bit under 1,500 sq/ft. We then had the boards ripped into 1' x 8' boards. 


We toyed around with various ways to lay and secure the boards. We looked at using laminate glue and laying them almost like tile, but that was going to get extremely pricey. Almost the cost of the wood itself. We decided on using a combo of sub-floor glue and nails. At first we were only applying the glue to the center of the boards, but after laying about 2 rows, we discovered that is was better to apply it to the edges to make sure the the boards didn't ever pop up on the sides.


After gluing a board down we then nailed each board in place as well. We made a "nail template" that you can see below to ensure that all the boards were nailed down evenly. You can't really see the nail holes now that they're done, but it was very handy to have. We used a chalk line to start with squared up to the center of the house and then we just started putting boards down like it was a normal hardwood floor.


We used 1" straight nails to secure the boards. I really wanted to use hardcut masonry nails, but this would have added not only significant cost, but significant time as well. I would have loved the look that the masonry nails added, but I'm glad we went with the cheaper/faster method.


Measuring and cutting was definitely the most time consuming part of the process. Luckily my husband has a good head for math and took care of it. 


After the floors were down we sanded everything with an electric hand sander and 220 grit paper. We considered the idea for renting a floor sander, but were concerned that we might go through the veneer on the plywood which we definitely didn't want to happen. There were quite a few spots where the boards were slightly uneven where the edges so we sanded those down. In the really bad spots we went ahead and sanded through the veneer to even them out and it gave the floor more of a rustic look which we really like. After sanding we vacuumed the floors and went over them with tack cloth to pick up any remaining dirt or sawdust.


These are the floors after being sanded and prepped. You could potentially skip the next steps and go straight to sealing them at this point if you wanted a lighter floor. We wanted dark almost black floors so at this point we started the staining process.

The stain we used was Miniwax Ebony. You can use any color or brand that you want, just make sure you test it on a board before applying it. Seems like common sense, but I have been known to simply buy a paint color without testing it out first, so I thought I'd mention it. Patience isn't my best virtue.


We used a deck pad stain applicator to apply the stain. We put it on pretty thick to make sure that the edges and nail holes got stained and there weren't any sneaky natural birch spots showing through. We applied stain on 2 rows of boards at a time, allowed it to sit for 5-10 minutes and then wiped away any excess. Then we rinsed and repeated. It wasn't a hard process, but it is frustrating that you can only do 2 rows at a time, otherwise it's too difficult to reach the boards and remove any excess stain.


 After the first coat the floors were a bit splotchy and uneven. Honestly, I kind of liked the way they looked with only one coat. If I hadn't wanted them a little bit darker I may have tried to convince the DH to leave them with only one coat.

After the second coat of stain I was happy we went with 2 the color was just so much richer! It's hard to tell from the photo, but it really warmed up the floors.


Once all the floors had their second coat of stain we were ready for the sealer. We went with a product called Bona Mega Clear HD and I must say I was pretty thrilled with it. We chose the satin finish. There are a couple of ways to apply it but we went with a T-bar. From all the videos I watched it seemed to be the easiest and fastest application method.


I wish I had taken some video of the actual application process, but sadly I didn't. You can find a few different videos on Youtube if you are really interested in it. The sealer took 2 coats. One gallon covered about 550 Sq Ft for us. We let the first coat sit and cure for about 2 hours before applying the second coat.

This photo shows the difference that the sealer has on the color. It really makes everything pop!

Here are some photos of the finished floors. 
As you can see the Bona gave everything a beautiful even sheen.


We left the wood in the bathroom natural because we wanted a darker paint color. This gives you a good idea of how it will look if you decide not to stain the floors and go straight to sealing them.


Well there you have it. We kind of lost track of how much stain we used, but after tallying everything up our cost came in at about $1 Sq Ft. Not too bad. I hope this might help anyone else who is trying to do some low cost flooring. I'll update later on how they are wearing with our 2 dogs as well as some pictures once the baseboards are up.